Our Pages

Friday, October 28

October 28th - All About Nomenclature!

We started off the class by briefly talking about the homework. We discovered that the Lewis electron dot diagrams aren’t always correct. This occurs when complex ions have to be drawn, and this may sometimes be a challenge.
Today’s lesson was about the naming of compounds. The IUPAC (International Union of Pure and Applied Chemistry) provides guidelines on how to name compounds. The ones we looked at today included:
  • Ionic
  • Binary Ionic
  • Polyatomic Ions
  • Hydrates
  • Molecular Compounds
  • Acids/Base

Most of these were review, but nevertheless, we will state the rules.
Zn2+: This contains an ion charge, and is called “zinc ion”.
MgCl2: The subscript refers to the number of ions.
Hydrogen can be both a hydride and hydrogen ion.

So let’s begin. First of all, we should determine the type of bond. Let’s start off with ionic and covalent bonds.

We can determine the type of bond between ionic and covalent using electronegativity difference. To do so, we have to follow these three steps: 

  1. Look up the electronegativity of both atoms involved in the bond. 
  2. Subtract the smaller electronegativity from the larger.
  3. Use the electronegativity difference to determine the type of bond.
  • 1.7 – 3.3 Ionic Bond
  • 0.3 – 1.7 Polar Covalent Bond
  • 0.0 – 0.3 Non-polar Covalent Bond
This method becomes trickier when there is more than one type of bond involved. In this case, we list all the bonds occurring, and find the difference in electronegativity. When drawing the dipole arrows, they always point toward the more electronegative element. The length of the arrow depends on how large the difference is. The name of the more EN element is written second. 

Now that we veered off topic, let’s talk about ionic bonds. Ionic bonds occur between a metal and a non-metal. The name of the metal comes first, followed by the non-metal, which changes its suffix to “-ide”. The anion (negative charge) does not change its name when referring to complex ions. We can cross the ion charges for the proper composition of the ions to have a net charge of zero. Remember, in ionic bonding, electrons are shared. One example is sodium and chlorine. We get NaCl.

Some elements can form more than one ion. This makes them multivalent. When writing the written version of the compound, we have to state which charge is used using roman numerals. An example is FeO. We have to write: iron (II) oxide.

Previously, before the IUPAC existed, there was the classical Latin naming system. There was the suffix –ic which meant large charge, and –ous which meant smaller charge. This means that this method works only with ions that only have two possibilities. Classical names include:
  • Ferr – Iron
  • Cupp – copper
  • Mercur – Mercury
  • Stann – Tin
  • Aunn – Gold
  • Plumb – Lead
  • Wolf – Tungsten
  • Argent – Silver

An example is plumbous sulphide. The formula would be PbS.

Next we have complex ions, which are held together by covalent bonds and participate in ionic bonds. They follow the same rules as ionic bonds. Be careful though, if a charge applies to them, brackets are needed.

Example: ammonium oxide. The answer is (NH4)2O.

Before we move on, we need to cover covalent bonds. They are simple, and use the prefixes mono, di, tri, tetra, etc. to tell us of the exact proportions, unlike ionic bonds, which give us a ratio. The prefix mono is used only on the second element.

Example: S2O4 The answer is disulphur tetraoxide.

Some compounds can form lattices that bond to water molecules. These are called hydrates. These crystals contain water inside them which can be released by careful heating. To name hydrates: 
  1. Write the names of the chemical formula.
  2. Add a prefix indicating the number of water molecules.
  3. Add hydrate after the prefix.
Example: Give the name for NaCl.6H2O: The answer is sodium chloride hexahydrate or sodium chloride six water.

That`s about it! Here's a video for additional review.


Posted by Andrew.

Wednesday, October 26

October 26th - Electronic Structures and Lewis Dot Diagrams

Today, we learned all about electronic structure and electron dot diagrams. In an electron dot diagram, also known as a Lewis Diagram, the nucleus of an atom is represented by the atomic symbol. To create a Lewis diagram for individual elements, you first determine the number of valence electrons. The electrons are represented by dots around the chemical symbol. The dots can be placed in four orbitals, each holding up to 2 electrons. You add one electron to each orbital before you pair up electrons. Here's how the Bohr model of three atoms would be represented in the form of Lewis diagrams:


As you can see, the Lewis diagrams hold the same number of electrons as the last shell of the Bohr diagram. 

When an electron exists by itself in one of the four orbitals, it is called a bonding electron. When two electrons are in the same orbital, they form what is called a lone pair.

We can also draw Lewis diagrams for compounds and ions. In covalent bonds (bonds formed by sharing electrons), we can create a diagram by:
  1. Determining the number of valence electrons for each atom in the molecule
  2. Configure the atoms so that the valence electrons are shared to fill each orbital and form a stable octet (full shell of 8 electrons)
Here's an example:
  
CO2 is made up of:
      

To pair up the electrons, we start with carbon. The atom that is the least stable in the compound is the central atom. We also must include two oxygen atoms into the equation. We bond the electrons, like so:


The compound takes this form, which is our final Lewis structure:


In the above diagram, the dashes represent pairs of electrons. There are two lines between the oxygen particles and the carbon particle, which represent a double bond. These lines apply to both particles; both oxygen particles and the carbon particle have eight electrons. The molecule is stable and there are no leftover valence electrons. Here's a video that shows the process in detail:


We can also draw Lewis diagrams for ionic compounds (bonds formed by transferring electrons). We can create a diagram by:
  1. determining the number of valence electrons in the cation (positive ion)
  2. moving these electrons to the anion (negative ion)
  3. drawing square brackets around the metal and non-metal
  4. writing the charges outside the brackets (because each became an ion by losing/gaining electrons)
Here's an example:

NaCl is made up of:
   
To pair up the electrons, we take the extra electron from sodium and transfer it to the empty space in chlorine's valence shell. We draw square brackets around each, and write the charges outside the brackets. This is the final product:

 It becomes stable; the valence shells are full! We have just successfully drawn a Lewis diagram for sodium chloride! 

Posted by Michael.

Monday, October 24

October 24th - Do You Follow Trends?

Do you follow trends? We sure hope so. Currently, there are seven very popular ones in our chemistry unit. They are reactivity, ion charge, melting point, atomic radius, ionization energy, electronegativity, and density. Sound interesting?

Elements close to each other on the periodic table exhibit similar characteristics. The first is reactivity. By this, we are referring to chemical reactivity. We watched a video where only two grams of Cesium reacted violently with water. In class, we saw sodium do the same thing, except it was on a smaller scale and did not blow up our class. Important points to remember for reactivity are:
  • Francium is the most reactive metal.
  • Fluorine is the most reactive non-metal.
An exception to this trend are the noble gases, which are the least reactive of all elements.

The next trend is ion charge. Element charges depend on their group (column). Let’s look at the lithium atom and ion. Remember, when an atom loses electrons, it becomes smaller. The radius of a lithium atom is larger than that of a lithium ion. The loss of electrons not only vacates the atom’s largest orbitals, it also reduces the repulsive force between the remaining electrons, allowing them to be pulled closer to the nucleus.

Next up we have the melting point. Elements in the centre of the table have the highest melting point. Noble gases have the lowest melting points. Starting from the left and moving right, melting point increases until the middle of the table. Tungsten has the highest melting point of these metals. An exception is carbon, which has a high melting point due to the strong covalent bonds between carbon atoms.

Do you notice a trend in the picture below?


Other than an increase in melting point from the first element to the bottom, we weren't able to find anything out either. 

Continuing, a carbon double bond has more force than a carbon single bond. However, the actual single bond has more strength than one of the two bonds of the double bond. This pattern continues for a triple bond. But overall, a triple bond is stronger than a double bond.

Up next is atomic radius! The radii decrease to the up and right of the periodic table. Helium has the smallest atomic radius, whereas Francium has the largest.

Next is ionization energy. Ionization energy is the energy needed to completely remove an electron from an atom. It increases going up and to the right. All nobles gases have high ionization energies. Helium has the highest ionization energy. Francium, on the other hand, has the lowest ionization energy. This trend is opposite to that of atomic radius.

And finally, we have electronegativity! Electronegativity refers to how much atoms want to gain electrons. This is the same trend as ionization energy.


You may be wondering what electron affinity is. Well, it is simply the energy required to add an electron to an atom. An atom’s electron affinity is the energy change that occurs when it gains an extra electron. You can think of electron affinity as a measure of an atom’s attraction, or affinity, for an extra electron. However, be sure that you understand the sign convention. Atoms that have a greater attraction for an added electron have a more negative electron affinity.

Did you know that Francium is electropositive, meaning that it wants to lose electrons?

This video shows many reactions and gives explanations for them:
 

Posted by Andrew.

Wednesday, October 19

October 19th - Atoms, Isotopes, and Mass Spectrometers

Today, the class started with a quick review of the homework. While going over the questions, we came across two new concepts; orbital diagrams and excited/ground states.

Orbital diagrams are diagrams that give us information about the orbitals and the pattern of electrons in an atom. Just like we can use electron configuration notation, we can use orbital diagrams to describe electron configuration. When drawing orbital diagrams, we start by drawing boxes to represent each orbital. Remembering that each orbital holds two electrons, we can draw two electrons in each box. Electrons are represented by arrows in orbital diagrams. For example, the 1s orbital will have one box with two arrows. The second will also have one box. However, the third box will be made of three boxes, each with two arrows. To properly draw a diagram, we must also follow the Aufbau Principle, the Pauli Exclusion Principle, and Hund's Rule. The first principle states that electrons are added one at a time to the lowest energy orbitals until all electrons in the atom are accounted for. The second principle states that each orbital can only hold two electrons. Both electrons must be pointed in different directions, representing their different spins. For example, you can never have a box with two 'up' arrows. Finally, according to Hund's rule, electrons occupy orbitals so that a maximum number of unpaired electrons result. For example, when adding arrows to the three boxes that make up the 2p orbital, we would add one to each box before we start pairing. Here's an example an orbital diagram for the element nitrogen:


The diagram above showed nitrogen in it's ground state. The ground state of an atom is the state where the atom's electrons occupy the lowest energy orbitals available. It is the lowest, most stable state of an atom. In most cases, the diagrams and electron configuration notation will represent an atom in it's ground state. However, you will sometimes encounter something like this:

1s22s22p63p

 You may be asking yourself why there is an electron in the 3p orbital, but none in the 3s orbital. This is because this atom is in it's excited state. Basically, the excited state of an atom is a state with more energy. You can find out the atomic number by counting the number of electrons; the number remains the same. However, if you notice that an orbital has been skipped, you will know that it is excited.

Now, onto the main lesson of the day; isotopes and atoms! On the periodic table, you will encounter information such as this:


This tells you the atomic number (top left), the symbol (centre), the ion charge (bottom right), and the mass (top right). To find the number neutrons, you can use this information. Simply apply the formula atomic mass - atomic number = neutron number. However, it is important to note that the atomic mass listed on the table is only the average of all the isotopes of an element. An isotope is a form of an atom with the same number of protons but a different number of neutrons. For magnesium, the isotopes are magnesium-19 to magnesium-40, inclusive. If we add up all the masses and divide it by the number of isotopes, we get the atomic mass! To write the isotope notation for magnesium, we would write the mass of the isotope on top and the atomic number on the bottom, like so:


If we were to look at the atom, we would find that it has twelve protons and twelve neutrons in it's nucleus. However, if were were to look at magnesium-23 and magnesium-25, we would find that they would have one less and one more, respectively.  To simplify this concept, we can use hydrogen. As you can see, the smallest isotope, hydrogen-1, only has one neutron. Deuterium (hydrogen-2) and tritium (hyrdogen-3) each have more neutrons:


The neutrons act as spacers to prevent protons from repelling. This is why the positively charged nucleus doesn't repel itself. 

Going back to magnesium, we can use a device called a mass spectrometer to find out the abundance and mass of all the isotopes of an element. A mass spectrometer uses a charged field to deflect a beam of charged particles (different isotopes). The heaviest particles will bend the least, and the lightest will bend the most. After deflection, we can measure where the particle landed on a screen and in what abundance. With that information, we can find out the different isotopes and their abundance! Here's a diagram of a mass spectrometer: 


With the help of a mass spectrometer, we now have information regarding the abundance of certain isotopes. This graph represents our results:


As you can see, magnesium-24 is the most abundance. However, you may notice that only two of the possible twenty other isotopes are listed. This is because the others are found in such small numbers in a sample that their relative abundance is only a fraction of a percent. This is why the percentage only adds up to 99 on the graph; the remaining 1 is made of the 18 other isotopes. It is also important to note that the same isotopes will be found in the same relative abundance throughout the universe.
We can add up the abundances to find the average atomic mass:

   0.78 x 24.00 amu
+ 0.10 x 25.00 amu
+ 0.11 x 26.00 amu
 24.14 amu

When we add it up, we get 24.14. When we round to 2 significant digits, we get 24 amu. Looking back, we know that the atomic mass of magnesium is 24.305. Using abundances and isotope numbers, we have just calculated average atomic mass!
Note: amu represents 'atomic mass units'. Also note that isotopes with a percentage of less than 1% were not taken into account


Posted by Michael.

Monday, October 17

October 17th - Electron Configuration and Orbitals

As we can recall from the previous lesson, an electron is a negative particle that exists in the orbital of the atom.

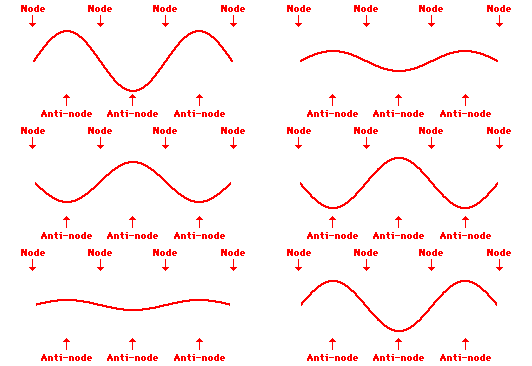
Today we learned about a modern theory called 'quantum theory.' In this theory, the electron is a cloud of negative charge, not a particle. Orbitals are areas in 3D space where the electrons most probably are. The area that is most dense is where the probability of finding the electron is the highest. Electron density is the density of this electron cloud. The energy of the electron is in its vibrational modes, like notes on a guitar string. There are also anti-nodes. In the picture below, we see where a node and anti-node are located.


This picture has a mode of three.

Photons are produced when high energy modes change to lower energy modes. Bohr stated that electrons occupy shells that orbit the nucleus. However, his theory does not match our understanding of electrons. What is the difference? Well, electron configuration around a nucleus can be one of many shapes. This depends on the element we are looking at. On some periodic tables, we can notice elements under the categories of s-, p-, d-, and f-blocks. What does this mean? Well, let’s find out. Let’s take a quick look:


Something important to notice is that despite being in period four, the d-block electrons are numbered 3. This is because the electron configuration moves from lowest energy to highest energy. An excellent picture to represent this:


S-Block:

Each orbital holds two electrons. (This is true of the other blocks as well. Each holds two electrons, and we will discuss this later on.) Hydrogen and helium are in the s-orbital only.

P-Block:

There are three suborbitals. They correspond to Px, Py, and Pz. Each, as mentioned above, contains electrons, together forming a maximum total of six electrons .

D-Block:

There are five suborbitals. Each contain two electrons, up to a maximum of 10 electrons.

F-Block:

There are seven suborbitals. Each contains 2 electrons, up to a maximum of 14 electrons.

When naming the amount and type of electrons in an amount, we use the following pattern:

abc – where a corresponds to the Principle Quantum Number (principal energy levels in an atom are designated by the quantum number); b to the orbital type (s,p,d,f); and c to the number of electrons in the orbital. This notation will tell us the electron configuration of an atom or ion. The added value of the superscripts is equivalent to the number of electrons in an atom.

Well, now that we are equipped with this knowledge, let’s try a question:

How many and what type of electrons are in scandium?

Well, we first identify the number of electrons, which is 21. Now, we start with the first s-block, which can contain two electrons. Then we progress to the second s-block, which can contain two more. Then we arrive at the three p-blocks, and obtain six additional electrons. We keep this up until we reach 21 electrons. The answer is: 1s22s22p63s23p64s23d1.

To check, we add the electrons up for a confirmed total of 21. We can break this down and see how it relates to Bohr’s model. 1s2  2s22p  63s23p6  4s23d1. The red represents the first shell, blue the second; green the third; and black the fourth.

Strontium can also be written as [Ar] 4s23d1. This shorter method utilizes the nearest (and preceding) noble gas and simply adds in the remaining electrons.  

Using the knowledge we learned, we know that [Ar], [Cl]-, and [Ca]2+ they all contain the same electron configuration, which is said to be isoelectronic. 

Posted By Andrew.